Let’s be honest. We’ve all hit the same wall—literally– before. You’re tired of looking at the same old beige rectangle in your living room, and your eyes are hungry for a fresh scene.
The good news? The solution might just be some stripes.
You don’t have to be a zebra to appreciate the visual appeal of a good line or two. After all, a striped wall can add depth, texture, and a touch of contemporary vibe to an otherwise drab space.
That’s why painting stripes is perfect for elevating bedrooms, home offices, or even that random wall you just don’t know what to do with. Here’s how to get started.
Materials You’ll Need
Before rolling up your sleeves, the first step is to gather these must-have items.
You will need measuring tape, painter’s tape, and a level for the stripe planning phase. Then, you will need paint in at least two contrasting colors, paint rollers and brushes, a drop cloth, a paint tray, and a ladder.
Planning Your Stripe Layout = Success
Do us both a favor and don’t wing your stripe design. That’s a surefire way to make mistakes and end up disappointed later.
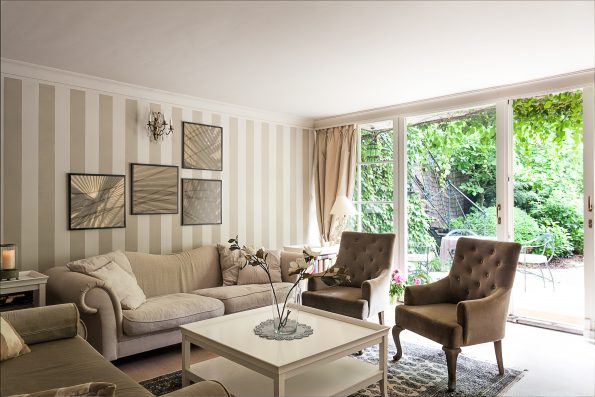
Instead, consider the room’s dimensions and how the stripes will interact with other elements like furniture or artwork. Want to make your ceiling look higher? Go vertical. Looking to broaden a narrow room? Horizontal lines are your friends.
Then, once you’ve decided on a direction, you can begin thinking about how wide to make the stripes.
When it comes to the width of your stripes, you’ve got options. A rule of thumb is to stick to 4 to 12 inches.
Thicker stripes can make a room feel more relaxed, while thinner stripes often make a space look more formal.
And if you can’t decide, it’s not a crime to mix various widths for a whimsical look.
Also, be sure to consider how your stripes will interact with the existing features in the room, like windows or artwork.
You could start your stripes from the middle of the wall to make sure they’re symmetrically aligned with a window or piece of art. Alternatively, begin your striping at the corner that’s most visible when you enter the room, making that your focal point.
Either way, once you’ve made a decision, it’s time to grab your measuring tape and a calculator.
First, measure the wall’s height (for vertical stripes) or width (for horizontal stripes). Next, divide the total measurement by the width you’ve chosen for individual stripes.
The result will tell you how many stripes you can fit. And if you get a remainder, it’s no big deal—just adjust the width of one or two stripes slightly.
Now, use your measuring tape and level to mark small lines where each stripe will go. A laser level can be a game-changer here. Just line it up with your marks and use painter’s tape to outline the stripes, making sure to double-check that everything is level and even.
And if you’re nervous about getting it right, there’s no shame in doing a little test run on a smaller area or a piece of cardboard. It’s better to tweak your technique now than wish you had later.
Choosing The Right Colors
Equally as important as stripe planning is color choice. When it comes to stripes, you want hues that will complement your existing décor, not clash with it.
So, it’s always best to keep it simple. Maybe pick one color from your furniture or drapes and find a complementary shade.
And remember, the contrast between the colors will set the mood. So, go bold if you’re feeling spicy, or choose softer contrasts for a subtle look.
The Painting Process
First comes everyone’s least favorite task: prep work. But it’s essential if you want to preserve the integrity of your furniture and flooring.
Start by removing any furniture from the area and laying down a drop cloth because, let’s face it, splatters happen. Next, clean your chosen wall with a mild detergent and let it dry.
Afterward, you can paint a base coat of your lighter chosen color. This will be the color of your ‘negative space’ stripes. Once you are finished, allow the paint to dry completely—overnight is best.
The following day, use your measuring tape and level to mark where your stripes will go. Then, tape them off with painter’s tape. Be sure to press down on the edges of the tape to prevent bleeding.
Once you are done taping, it’s finally time to bring those stripes to life. All you have to do now is paint the open areas with your contrasting color. But forewarning: you may need to apply more than one coat, depending on your chosen hue’s richness.
Then, after the paint is dry, carefully remove the painter’s tape to reveal your work of art. You’ll want to do this slowly to avoid ripping off any paint.
Lastly, once you’ve unveiled your handiwork, don’t fret if there are some flaws. Nobody’s perfect, and any imperfect lines or patches can be simply touched up with a small paintbrush.
If true crime defines your free time, this is for you: join Chip Chick’s True Crime Tribe
Sign up for Chip Chick’s newsletter and get stories like this delivered to your inbox.

By Katharina Buczek
Katharina Buczek graduated from Stony Brook University with a degree in Journalism and a minor in Digital Arts. Specializing in... More about Katharina Buczek